
Dutch oven Split Pea Soup Video
(Closed Captioning is available on this video)
You can find the complete recipe here: Dutch oven Split Pea Soup
Video Transcript:
Presenter:
Hi, everyone, this is Gary House from the Cooking Everything Outdoors show.
And today, we’re going to be preparing one of my favorite soups, Split Pea, also going to be making a brand new beer bread recipe, all on cast iron, all on the Camp Chef Big Gas Grill today on the Cooking Everything Outdoors show.
Announcer:
This is Gary House with the outdoor cook Cooking Everything Outdoors show, I hope you try this at home.
Presenter:
So, first things first, we need to get our beer bread going.
It’s a brand new recipe.
I don’t even really have a name for it, but it has the traditional beer bread ingredients that we normally used in the past.
I’m adding some dried tomatoes.
These are just absolutely wonderful.
I’m going to be using a garlic and herb feta cheese, and then a nice little combination of margarine and basil to give it a little accent and a little bit more of a flavor in there.
And that is all going to be blended together and cooked in our Big Gas Grill.
But first thing I’ve got to do is I need to modify this a little bit.
I’m going to be putting the beer bread in the cast iron pan.
And this is just a basic loaf pan.
But if I put it directly on top of the cooking grates on the Big Gas Grill, it’s going to top out and I’m afraid the beer bread’s going to rise up to where it’s going to hit the top of the grill cover.
So what I’m going to do is I’m going to take one of the grates out and then I’m going to drop the other one sideways down low, so it’s going to give me plenty of clearance in there.
So watch how I do that.
So let me show you what I’m talking about.
And you can see the grates are right at the top of the bottom of the grill box and if we put this pan right in the centre, there’s very little clearance in there.
I know you can’t see that, but there’s maybe 1/2 an inch or so clearance from the top of the bread pan to the hood of the grill.
So what I’m going to do is I’m going to take one of these out.
Now I’ve been cooking on mine a lot, so they’re a little dirty.
Get some nice gloves.
And what we’ll do is we’ll very gently remove one of these and we’ll set it down here.
And this is all my cooking goodness.
And I think what I’ll do is I’ll drop this down lower and what that’s going to do is give me probably another inch of clearance and I think that’s going to be enough.
So having done that, we’re going to get this preheated.
I’m going to turn my burner on high.
That one’s going.
And I’m going to go between the medium and the low setting on this.
I’m going to get this up at about 325 degrees.
Around that range is what I’m going to try to bake at.
So we’ll preheat that while we’re mixing up our bread recipe.
Okay, our basic beer bread recipe, if you remember, 3 cups of self-rising flour, 3 tablespoons of sugar and 1 teaspoon of salt and a can of very inexpensive beer.
Try different types of beers, they all add different flavors and such.
This particular beer I’m using right here gives me a little more hoppiness to it.
If you’re a beer drinker, you know what I’m talking about, but it’s just a little bit of a different taste.
Didn’t say it’s bad.
Didn’t say it’s good.
It’s just different.
And you need to experiment with brands that you like because they all add a little different flavor.
But I think this is going to be really, really, good.
So the first thing we’re going to mix up our few dry ingredients and this is about a teaspoon of dried basil and dried margarine.
And if I didn’t say that right, that’s because it’s me.
So, you know, wonderful, wonderful flavor here.
And this is dried, you could certainly use fresh.
In fact, I totally encourage it.
I have about a cup of these real nice dried tomatoes and they are very pungent, but it’s going to add some wonderful color and I think some really good flavor to them.
And these were already julienned in the little bag that I bought them in.
So we’ll get that mixed in there.
And the cheese that I picked up, just at the local grocery, it is a basil–excuse me–a garlic herbed feta cheese.
And you know that I like feta a lot.
And so I think this is going to work out really, really, nice.
And if you haven’t figured it out yet, I’ve yet to make this bread.
So this is just off the top of my head, just another idea I had.
If you buy the cheese in the block, it crumbles up larger chunks which I think adds some more flavor than if you were to buy it already pre-crumbled.
That typically is very, very, tiny pieces and with anything that I cook in it’s got to be chunky.
I want to taste everything.
And this is about I think it was a 1/2 a pound, which may or may not be overkill.
And, yeah, 1/2 a pound.
Let’s mix this up here.
And I’ve already mixed up the sugar and the salt in with the self-rising flour, so that’s ready to go there.
Now the big secret with beer bread is once we add the beer that we do not over mix.
A couple people have written me back and said, “Oh, my beer bread just didn’t rise. It didn’t do what it was supposed to do. I was really disappointed.”
And they were out there really pretty much working it like a traditional beer and it’s not.
You just want to get the ingredients mixed up and a very wet solution and it plops into your pan.
I always pour about 3/4 of my beer in to start with.
And you can see that’s not enough but I find that it’s better to go a little less than a little too much.
I don’t want it to pour out of my bowl.
I want it to glop.
You can imagine what a glop is.
It’s almost there.
Now say if you only had one beer and you ran out of beer, you could add a little bit of water, it’s not going to hurt, but we’re getting all of our yeast from the beer and it’s getting gloppy.
I’m going to add the rest of the beer and I think it should turn out just to be perfect.
Also, been asked whether you could use a non-alcoholic beer?
I think so.
I haven’t tried it yet and I definitely need to add that to my recipe to see how that works, but really we’re not in this for the alcohol content, we’re in it for the yeast factor.
Okay, now you can see how that looks.
That’s really gloppy.
I’ve already pre-greased my cast iron pan.
This is from Camp Chef.
This is one of their Sante line and, as you know, Camp Chef is one of my sponsors.
And I’m just going to put a little bit of cornmeal on the bottom of this just to give me a little bit better release.
And then all we’re going to do is plop this in the pan.
And plop.
I didn’t overwork it.
I just stirred it up enough to mix it up.
I’m going to very roughly place it in there, shape it, if you will.
And then that’s it.
I expect I’m going to get a couple inches of rise out of that and if I don’t, I’m in trouble, but that should be the case.
And that’s it, that’s just another beer bread.
You can see by looking at it it’s already got some nice color to it.
And I think we’re going to have a really good one this time.
So my Camp Chef stove is right at 350.
I think we’re going to drop it in there.
With the big gas grill we’re going to control the heat in two ways.
I’m going to be adjusting the burners down below.
Definitely probably getting as it heats up more and more closer to the low setting and then I’ll also be adjusting the vent that’s up on the top to control the heat.
Now, keep in mind that this vent gets really hot, so you don’t want to just touch it with your bare hands.
And, you know, I always keep my Dutch oven gloves around.
And opening it up lets more heat out and I think we’re going to get– in fact, I know we’re going to get some additional flavor on our bread because of all the stuff that I left in the bottom of this grill box from our previous meals.
We’ll just call this barbecue beer bread.
Alright, let’s drop this in there.
Okay, that’s going to give me plenty of height.
I’ve turned these all the way down to low.
I’m going to monitor the temperature here.
I’m going to keep my eye on it the whole time during the cooking process.
This is going to take 40-45 minutes.
It could be just a little bit less, but I’m looking at 45 minutes.
While this is cooking, we’re making our split pea soup.
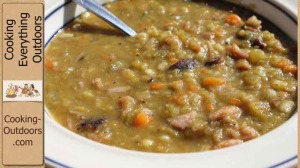
We’re calling this Nancy’s Split Pea Soup.
This recipe came from a friend of mine, Nancy Smith and Bryan, apparently this recipe was from her mom who found it in a magazine many years ago.
So I don’t know where this recipe originated.
I’ve altered it slightly, just a little bit, but the ingredients it’s really once you’ve prepped a few things it’s dump in a pot and cook it.
It is so simple.
And it’s just rich and full and just absolutely wonderful.
I’m going to be using a 12 inch Camp Chef Dutch Oven on my Camp Chef Big Gas Grill.
The ingredients that are in this are about 1 cup of onion.
It’s actually half a small onion.
I’ve got half a large onion.
I add a little bit more.
A cup of chopped celery.
One chopped garlic, I used 1.
Tablespoon of butter.
The recipe calls for bacon.
I like ham in mine, so I put some ham chunks.
I probably have roughly a cup there.
2 large carrots.
This is a bunch of little carrots.
Roughly a cup.
Let’s see here.
A teaspoon of sugar.
Sorry, I got to read this I don’t have it memorized, so this is allspice.
Now it calls for whole allspice cloves, I don’t have any.
Or you can use a dash of allspice.
What’s a dash?
Maybe 1/8th of a teaspoon.
That’s about all that’s there.
Couple bay leaves.
We’re going to take those out at the end.
1/4 teaspoon of pepper.
A 1/8th of a cup of barley.
And then 1 cup of dried split peas.
That’s really it.
It’s that– oh, and 6 cups of chicken broth.
And that’s just 1 large can about 49 ounces.
So that’s it.
What I need to do now is I’m going heat up my Dutch oven.
A couple of thoughts here on the Dutch oven, I’m putting mine directly over the flame, so that means I’ve got to be careful.
I’d keep it turned down or I’m going to be scoring the bottom.
They make what’s called a diffuser plate, which is a metal plate that can go between a gas burner and your Dutch oven.
I don’t have one, so I’m kind of going to play with it.
I originally thought well, I’ll just put the lid under there and then I’ll heat the lid and I’ll heat the pot, and you know what, I’m just going to give this a shot right under the burner.
I’m going to have to keep it down on low I’m sure.
But this recipe typically takes about 2 hours to cook and I’m going to speed a little bit of it up because I’m going to cook in some butter, my celery, and my onions, and my carrots and do a little precooking on that.
Just for a few minutes to get those things going.
Then we’ll dump everything in there and then we’re going to let it simmer and cook and probably about an hour I’m going to have this bad boy ready, I’m hoping, it might take longer.
So hang in there.
Let’s see what we’re going to do.
Okay, let’s get this burner going.
I’m going to take my lid off.
It’s actually already hot from the sun.
And I’m going to just put it over here.
And it is getting really hot.
So to turn this, just push to turn and you turn your starter.
And, boom, that’s it.
Now I’m going to get this way down on low.
And I’ll play with it as we go.
I may want it higher, may want it lower.
I got to keep an eye on it is basically what I’m telling you.
This traditionally maybe you could put it in a crock pot and just walk away from it, but I’m not thinking I’m going to have that luxury because I got to monitor the bread, monitor the soup, so we’re going to be keeping a close eye on it this time.
Start out with our butter.
And then I’m going to add my onions, my celery and my carrots.
Okay, we’ll get those going.
And I’m just going to sauté them until I get some color out of them, soften them up a bit and speed up the process.
And I’ll be right back after I’m done doing that.
So we’ve been sautéing it a little bit.
The vegetables are kind of softened.
Got some color on the onions.
Now we’re going to add all the dry ingredients starting with the garlic because I want to smell that first.
Okay, that was 2 cloves of garlic.
Recipe only calls for one but got to kick it up a bit.
Let’s get our ham in there.
And I just chunked this up.
You can dice it, you can mince it, whatever you want to do, but I just chunked it up.
Some nice smoked ham.
And our pepper.
And a dash of allspice.
I believe this was a teaspoon of sugar.
1/8th of a cup of dry barley.
And a cup of our beans.
2 bay leaves.
Does call for one, typically bay leaves are a little bit larger than this, but this’ll do and once it starts cooking and releases all these flavors it’s just absolutely wonderful.
But remember to take it out when you’re done cooking unless you like to eat it.
I imagine some people are just going to chow that down and not care about it, but I’m not too big of a fan of old dried out leaves in my soup.
Let’s get this mixed up.
Oh, boy.
That already smells incredible.
So let’s take our 6 cups of stock.
Get that mixed up.
What I’m going to do is I’m going to bring this to a boil and once we get it up to boil we’re going to turn it down to a slow rolling boil, a little bit more than a simmer.
Just going to stir it every once in a while.
Keep an eye on it.
And do it with the lid on.
I totally think it could be done with the lid off, in fact, I’ve done it many times with the lid off, but I got a lot of flies and buggers around here, so I’m going to keep the lid on this time as I’m cooking it.
So let’s see how we do.
We got a ways to go.
I’m sure the bread’s coming up nicely.
It’s been in there for a little bit now.
We’ll take a sneak peek about halfway through, see how we’re doing.
Let’s take a look at our beer bread.
It should be done.
Hmm.
That looks fantastic.
Okay, this is really hot.
Let’s bring this out.
Well this absolutely looks fantastic.
Let’s try to get it out of there.
It should just roll out and hopefully we didn’t burn the bottom.
Always remember the cast iron is very hot.
This should, in theory, just come out like so.
Nice thump on the bottom.
Browned nicely.
Let that cool off while we finish cooking up our soup.
Now, you heard me talking about these before and this is your lid trivet.
This is what’s going to go on the ground so that our lid does not go on the ground.
Works really well.
Keeps all the bugs and critters off of there.
Okay, wow, look at that.
That’s starting to thicken up.
And getting just where we want it.
A little something floating in there; let me get that out real quick.
And that is thickening up very nicely.
I would say we probably have, maybe, 30 minutes left to go.
Put that lid back on.
Get it back up to a nice boil.
We got split pea soup coming.
The bread is done.
It’s been cooking, it cooked for 45-50 minutes roughly around there.
The soup’s ready to pull off and that is absolutely almost done now.
We’ll do the final steps on all this and hopefully you can see in my minimal light here, but I think we got something good going on.
So I’m going to put a little paper towels down here because I’m going to set the Dutch oven on top of my lid and it’s going to have a lot of moisture and stuff, so I’m going to try to pick up some of that without soaking up our tablecloth.
Reason I’m putting the lid down first is simply to protect my table surface.
This is not nearly as hot as the Dutch oven itself.
Now you can tell when this is done by the simple fact that the peas have basically exploded, everything is soft and tender.
So what we need to do now, I need to mush this up.
And as I go through there I’ll find my bay leaves and get them out.
Now you could take this out and run it through a blender if you want.
There’s nothing wrong with that.
The only reason I don’t do it in a blender is because I like it a little bit chunky.
I don’t want a creamy pea soup, if you will.
I really like something I can taste the bits and pieces.
So I just use a regular potato masher and then when you’re out camping this makes it even easier to do this way because you don’t have to worry about getting one of those expensive gas powered blenders.
And just simply mix this up as much as you like and you’ll see the barley in there, little pieces that look like rice.
And this is getting pretty darn close to where I like it.
And, oh, boy this sure smells just wonderful.
Here’s that other bay leaf.
I knew that would show up sooner or later.
And, for me, that’s a good consistency.
I like that.
And let’s see here, we’ve got to slice up our bread.
So let me move a couple of things around here.
Been letting it cool off on a trivet.
And let’s see if we can do some rearranging real quick here.
Okay, soup to the side.
Get our bread out and cut.
See how we did there.
Mm, I’m thinking this is going to be just perfect.
So crisp, crispy, crunchy?
Oh, yeah, got some nice color there.
Those tomatoes are really pungent.
And look at that.
I would say that is a pretty darned decent loaf of bread there.
Our typical 10,000 flies.
Let’s serve some of this up and we’ll call it a wrap.
Nancy’s Split Pea Soup.
Gary’s Dried Tomato and Herbed Beer Bread.
That is how I do it.
So give it a try.
It’s hearty, it’s healthy, it’s wonderful flavors.
Create some beer bread to go with it or buy some off the shelf, whatever you want to do.
But most importantly, hey, stop over at iTunes, leave me a review.
I need to get those numbers in.
We got 40 really great wonderful comments on there.
I need 100, helps the show.
Make sure above all else you go and say thank you to my sponsors, Island Grillstone and Camp Chef because without them none of this would be possible.
And without you I wouldn’t be doing any of this.
So thank you.
This is Gary House with the Cooking Everything Outdoors show.
Split pea soup and tomato basil feta cheese beer bread.