Worlds Best Dutch oven Ribs Video
I finally decided to share via video my How To make Dutch oven ribs with everyone. One of my most complimented recipes at the Dutch oven events I go to and a favorite of my families. You can find the original article here: “Best Dutch oven Ribs You Will Ever Taste!” from 2008 and the rub recipe here: Basic BBQ Rub Recipe from Steven Raichlen’s Barbecue Bible book “Sauces Rubs and Marinades Bastes, Butters & Glazes”.
Hope you enjoy the video!
(Closed Captioning available on this video)
Video Transcript:
Presenter:
Welcome to the Cooking Everything Outdoors show.
Today, we’re making the World’s Best Dutch Oven Ribs.
Gary House with the outdoor cook Cooking Everything Outdoors show, I hope you try this at home.
World’s Best Dutch Oven Ribs.
Kid you not, I don’t think I have a recipe on the Cooking Outdoors website that gets more compliments than this rib recipe.
I’ve done it at Dutch oven dogs which are Dutch oven gatherings.
And people still come back to me and say, “Those are the best ribs I’ve ever had.”
So I’ll leave it up to you but for now I think the title is pretty darn appropriate.
I’m using an oval Dutch oven roaster.
And this is from Cabela’s.
And I believe it’s about 16 inches long and it’s not a traditional Dutch oven that you would normally see.
It has no legs on it.
So it’s not designed for camp cooking, if you will, but it works fantastic for camp cooking.
There are some tricks to using this and I’m going to show you those next.
In order to use this oval roaster with charcoal, we need to get it up and elevated.
And that’s really simple to do.
What you need to have are two of these lid trivets.
Now typically they go in this position here.
But I find that the oval roaster will slip off of it, if it’s in this position.
So we’re just going to turn it over.
We’ll need two of those.
And those will go on the bottom of the Dutch oven and those are going to elevate them or elevate the Dutch oven from the coals and we’ll put a layer of coals on the bottom.
And then with a normal Dutch oven you typically have a rather large rim around it to hold the charcoal and this one has a small rim.
So we’re going to be a little bit more careful with putting our charcoal on the top of this.
And I highly recommend using a low ash content charcoal.
When I’m using this one of the charcoals that I like to use is Coshells coconut charcoal.
Just fantastic, very little ash, steady burning product.
So you might want to look them up and see what you can find on that product because it’s really, really good.
So what goes into the world’s best Dutch oven ribs?
The basic ingredients are surprisingly simple.
What we’re going to do is we’re going to put a layer of vegetables, specifically a red and yellow bell pepper and a yellow, maybe yellow to me but actually it’s a red onion.
We’re going to slice those and we’re going to lay them on the bottom.
And we’re going to take our ribs.
Now I’m going to be using St. Louis cut pork ribs.
And we’re going to put a honey mustard binder on there.
Once that’s been coated on the ribs I’m going to apply my rub to it.
Then we’re going to take our beer and this is a Guinness stout.
It’s room temperature warm.
And we’re going to pour that in to the Dutch oven.
And then on top of the ribs we’re going to be applying a barbecue sauce.
You can use whatever you want.
I am really partial to Trader Joe’s Kansas City barbeque sauce.
I just keep going back to this and going back to this and going back to this, so I really, really enjoy it.
And that’s pretty simple, that’s the recipe.
I’m going to show you how I cut it up and get it prepared.
Okay, first things first, sharp knife.
Take our bell peppers.
I’m going to deseed them.
And then I want ringlets just like that.
As fresh bell peppers you can get.
And we’re going to use all of it.
Simple as that.
Take a red one.
Deseed that.
Get ringlets.
I guess you could probably leave the seeds in.
I can’t see where there would be any advantage to that other than maybe saving you a couple of steps.
There are some seeds that are going to end up in this.
But it’s not big issue.
And then our onion we need to do the same.
Just get that peeled off as best as you can.
Sometimes they’re a little tricky.
Hopefully this one doesn’t have me crying yet.
It is making quite the mess.
Would you expect anything less?
Okay.
And then get some ringlets out of this.
This is a fairly large red onion.
So once we’ve got this done…and these are about a 1/4 inch slices on everything, that’s about what we’re looking for.
Let me clean up this mess a little bit.
I’m going to show you how to start layering the Dutch oven.
What we’re going to do is basically use the vegetables to elevate the ribs and that’s going to help keep it from completely being boiled in the cooking process.
Let me show you how we’ll just basically just layer this out.
And I find it doesn’t have to be overwhelmingly perfect by any stretch of imagination but we’re just looking for is some layers here.
And you can mix them up and you can do some onion, you can do some bell pepper.
But you can see we’re getting some hype in the bottom of this pan and that’s what we’re looking for.
We are going to be partially boiling these a little bit and we’re going to be using some steaming and roasting, baking, if you will, in our cooking process here.
But let me tell you that all this stuff in the bottom, basically what it’s going to do is it’s going to cook in the beer, in the rib juices, get some of the barbecue sauce.
It’s going to get some of the rub on there.
And it’s going to make the most incredible slop you’ve ever tasted in the bottom of a pan.
Kid you not it’s probably one of the better parts of this whole dish.
Okay, let’s get our ribs going.
These are my St. Louis cut pork ribs.
I’ve already removed the membrane from the back and now all we have to do is apply our honey mustard binder.
And simply it’s honey mustard and a put a light coat on all sides of the ribs, and let’s do that now.
But first to facilitate cleanup we need some of these bad boys or not.
It’s entirely up to you.
Let’s do this.
Mustard.
Get that nice and coated on the…you don’t have to do the mustard binder.
I just really like it.
Add bit of a tang.
But really allows the rub that you apply to adhere to the food and stick nicely.
Okay, so we’ve got that going and now what we need to do is apply our rub.
And I need to get a little of this off here.
What I have here is a sweet and hot, I called it sweet heat pork rub.
I use this on my ribs all the time.
It’s a winning formula that I’ve used, many years.
We just really want to work this into our ribs nicely.
I almost think I don’t have enough rub here but let’s see how it goes.
Sink or swim, baby, on the Cooking Everything Outdoors show.
It’s the way it goes.
Okay, yeah.
I think this is going to be fine.
Now, we need to get these into the Dutch oven.
Let me clean up a bit and I’ll show you how to do that.
So, let’s get our ribs into our oval roaster.
Nice, just set them right in there, right on top of the bell peppers and onions.
Now, some of you may not have an oval roaster and all you have is a Dutch oven.
It will work just the same.
Just cut your rack of ribs in half.
And you can set them in a 14 or a 16 inch Dutch oven.
You could even stack them, if all you have is a 12 inch Dutch oven.
It does work but make sure that if you do stack your ribs that you put your barbecue sauce on the first layer and then put your other one on top of that or you’re going to miss out on some good flavors.
So, let’s talk about our barbecue sauce.
And all I do with this, once I get the childproof wrapper off, go figure, I’m going to probably need a knife.
Let’s see if we can force this off.
Ha, alright, so I’m just going to basically pour the sauce on top of this and as it cooks it’s going to ooze out over the ribs.
I’m not even going to bother anything more than that.
Fix this cap and that’s that.
Now, for the cooking fluid, now vegetables are going to create some fluid in there.
The ribs are going to create some fluid in there but I like to add a little bit something extra.
And that’s my Guinness.
And I tell you, I’m so happy this comes in a 6 pack, because I only need 1 beer for this recipe and you know where the rest is going.
And we’ll just pour the whole bottle in the bottom there and you can see that, you know, the fluids are not touching the ribs.
As those vegetables break down a little bit later on, that’s going to settle down in there.
And that’s really, that’s it.
I’m going to show you how to set up the charcoal.
Get these bad boys cooking.
Charcoal is ready to go.
I’ve got a full container here.
I won’t need that much but a little overkill never hurt me.
I’m going to set this charcoal and I’m going to pour a little bit out on each side of my table here.
That’s going to make it easier for me to place my stands.
So these, gloves, please, really hot.
And so I’m going to set them like so which is going to be just a little bit like that, about the width of the Dutch oven.
And then I’m going to place a ring of charcoal around the bottom of my Dutch oven.
And this is going to be about 16 coals on the bottom, roughly.
About like that.
So we got 2, 4, 6, 8, 10, 12, about 14 here.
And we’ll set our Dutch oven down.
Now, one the reasons I’m talking about gloves a lot is because one of the difficult things about this cooking process is getting this lid off of here.
And it’s going to be extremely hot and you’re going to need gloves to do it.
There’s no lid lifters to pull this up.
So let’s take our Dutch oven here.
Got it settled.
The coals look really good around the bottom.
I got the heat rising.
And now I’m going to put about 16 on the, well close to 16 on the top.
We’ll count them out here.
Boy, this is high definition.
You could probably see me sweating because these coals are adding to the daytime temperature here.
So let’s get another one on there and we’re just using the ring method which is basically ringing the top of the Dutch oven.
Not going to go too heavy there.
We’ve got 2, 4, 6, 8, 10, 12, 14, yeah, 17 so it’s pretty close.
And we’re going to let this cook for probably about 45 minutes, these charcoals are going to last me.
And it’s going to get pretty hot in there.
You’re going to start smelling this really, really quickly.
It’s going to start smelling incredible.
But this cooking process, it’s going to take about 2 1/2 to 3 1/2 hours.
Probably closer to 2 1/2 hours is what I’m guessing.
It’s a fairly decent rack of ribs.
So I’ll show you how I add more charcoal to this as we get cooking.
So it’s been about 45 minutes now.
And the coals are starting to break down.
About the 35-minute mark, I started up some fresh coals.
And basically what I’m going to do is I’m going to add just a few more on the bottom but even more on top.
And I’ll show you what I mean by that.
It won’t take much more coals.
I think that we used, what, 32, 33 when we first started this and really all I’m going to be doing is adding probably about 12 to 15 more coals at this point.
And I’m just going to continue that process until those ribs are done.
So we’ve got 4, 8, 9, about 10 on the top.
And just a few around the bottom.
Try not to burn my face here as I do this.
The charcoal chimney full of charcoal is quite hot.
So there’s 3, 4, 5, 6, about 8 on the bottom.
I think that’s going to be more than enough to keep our cooking to continue.
So right at this point, and you can even see this steam whisping up because all those juices are really perking in there and flavorizing that meat and slow steaming it.
It’s roasting at the same time.
The flavor and the smell is just absolutely incredible.
And I haven’t even looked yet but I’m going to say we’re probably a good hour more to go on these ribs.
And then we’ll take a peek at the 2 hour mark.
So we’re just about at the 1 hour mark, right now.
Our rib’s been on for about 2 hours now.
I think it’s time to take a look to see where we’re at.
Gloves on.
I’m going to try to get behind this thing so you can see.
And very carefully you need to grab the handles here.
And we don’t want to get any ashes in there.
And, wow, look at that.
I have to tell you, this smells absolutely, absolutely phenomenal.
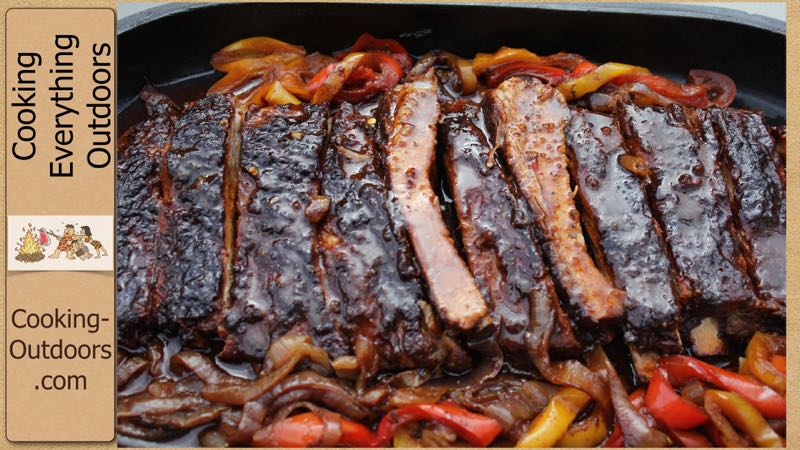
Time to plate these bad boys up.
Now, you can, as I normally do, just cut the ribs right in the slop here and serve up them up that way.
They’re really, really good.
You could also put them on a platter if you had a big enough platter.
I don’t but here’s a point that I’ve used this before in other dishes but the lid for this oval roaster makes a mighty fine serving platter.
So that’s what we’re going to do.
We’re going to get these ribs out of here and we’re going to serve them up on that.
Simply, up and on the platter.
I want to get some of this flavor out of here.
I got to tell you that these are going to make a heck of a mess out of my tablecloth but that these are some of the best veggies you possibly have had.
All these juices that are in here certainly good for serving up on top of the ribs.
And, as always, it takes just a couple seconds for the flies to show up.
Those look great.
Now, you can cook these to competition crispness.
You can cook them until they fall off the bone.
You can cook them however you like to enjoy them.
I have this right where I want them and I must say that it look pretty darn good.
So we’re having ribs.
Hope you try this.
I think they’re the world’s best.
Certainly willing to accept any and all takers on Dutch oven ribs.
I want to point out that the show Cooking Everything Outdoors is sponsored by Camp Chef, www.OutdoorCooking.com and Island Grillstone.
And I hope you go and visit my sponsors because they make all of this happen.
You can find us on iTunes, on YouTube, on Blip.tv, iFood, everywhere including Facebook.
And I do hope you take a few minutes to stop by and let me know what you think.
This is Gary House Cooking Everything Outdoors.
World’s Best Dutch Oven Ribs.
I watched the best Dutch oven ribs and would like to know what the “rub” consists of. it was never mentioned. Thanks.
Here is the link: http://www.cooking-outdoors.com/basic-barbecue-rub.html
Thanks for watching!
Great video! Should I cook my ribs Bones up or bones down? Suggestions?
I cook mine ribs down Tim. Much better to baste/sauce the meat than the bones.
Hi Gary.. love the videos, just found the site..which is amazing for me as all my cookware is cast iron, & using a dutch over is key to many things I make. I would very much like to have to use the “rub” for the “worlds best ribs” but..the link is broken. Could you email it or .. make a new link?
thank you again for hosting such a great site~!
~JaZz~
JaZz, Thank you for the kind words! I fixed the link error (Thank you)
Let me know if you have any other questions!
Gary